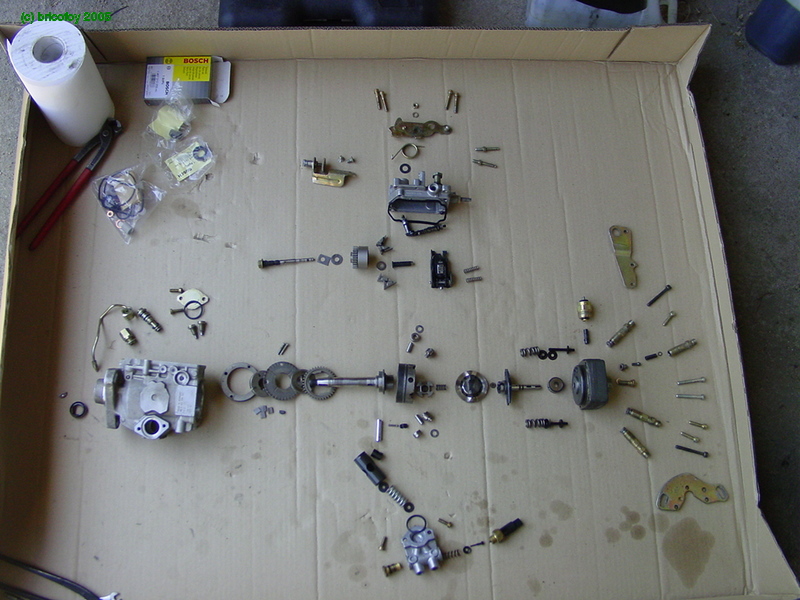
VE injector pump assembly pictures.
Moderator: Fatmobile
Hello, I have a 79 rabbit and I am having some trouble disassembling the hydraulic pump from my injector. All of the pictures and info I've gotten say the hydraulic pump should have 4 bolts that can be taken off with a 5 hex key. Mine only has 3 of these bolts. In the fourth corner is a bolt that needs to be removed with a flathead screwdriver. I cannot get it out. It is made of very soft metal and I am worried about stripping it. It also appears that some kind of yellow material was under the bolt head (maybe locktite?). I was wondering if anyone had any advice on how to get the bolt out.
-
surfcam
- Turbo Charger
- Posts: 1482
- Joined: Tue Sep 28, 2004 8:43 pm
- Location: Canada Southern Alberta
- Contact:
Maybe a little heat and a impact screw driver. That's the kind you use a hammer with. Usually worth about 10 bucks. Be careful of the diesel doesn't lighting up. Drain it good first.
99 TDI Jetta (Z1 engine code)
94 Grand Caravan
89 Dodge Gold Stream B class
http://www.antiquedollhouseofpatterns.ca/
94 Grand Caravan
89 Dodge Gold Stream B class
http://www.antiquedollhouseofpatterns.ca/
-
surfcam
- Turbo Charger
- Posts: 1482
- Joined: Tue Sep 28, 2004 8:43 pm
- Location: Canada Southern Alberta
- Contact:
Glad it worked for you. It's something a old motorcycle guy can't be without. There's just no other way to get beat-up screws out of the side covers.
99 TDI Jetta (Z1 engine code)
94 Grand Caravan
89 Dodge Gold Stream B class
http://www.antiquedollhouseofpatterns.ca/
94 Grand Caravan
89 Dodge Gold Stream B class
http://www.antiquedollhouseofpatterns.ca/
thank you veeman for putting the pics online and libbybapa for digging them up, I wouldn't dare to take a pump apart before I saw the procedure.
it took me two days of careful cleaning and selecting replacement parts, but my van is on the road again! 9mm plunger(was 8mm) and governor mod done as well
it took me two days of careful cleaning and selecting replacement parts, but my van is on the road again! 9mm plunger(was 8mm) and governor mod done as well
-
DervConvert
- Cetane Booster
- Posts: 28
- Joined: Tue Oct 20, 2009 5:38 am
- Location: South Coast, UK
In the three years I've been consuming as much info about the VE pumps that my mind can absorb, I've yet to find a guide on disassembly. I've seen a few warnings about the distributor head which I assume is down to the two large springs causing massive tension on the shaft and securing bolts.libbybapa wrote: So…Here’s the starting point, the pump and a packet of seals containing the throttle lever sleeve and the mainshaft seal.......
...........................................
And here's the same thing an hour later..
Now, at last, I have my very own spare IP to play with I'll be sourcing and locating a repair kit and new nozzles then I'll be ready to get stuck in. Except I'm not sure how or in what order to dismantle it. I guess I have to start with the LDA, then the governor cover but after that I'm lost. Could anyone please give me a quick rundown of any "gotcha's" to be aware of and the best order of disassembly (as this guide appears to be a best guess rebuild - playing it by ear so to speak and not without mistake)?
Regards,
M
M
-
hagar
- Hillbilly Tuner
- Posts: 2424
- Joined: Sat Mar 11, 2006 10:11 am
- Location: Near Lund B.C. Kanada.
VE injection BOSCH.
DervConvert : about the BOSCH VE pumps , you are off to a good start. Keep going.
To take apart ordinary tools will do it NO need to grind any sockets etc. . I have done many. I shall try to get the "Worm" to send you a copy of the BOSCH manual I am sending to him.
One WARNING , take your time , haste makes waste. EH ? and Andrew is a good helpmate..
hagar.
PS : I use Paraffin Wax to hold some springs and shims in place when assembling. (ParoWax) it works like an exstra couple of hands.
-
girlguidebiscuit
- Glow Plug
- Posts: 8
- Joined: Sun Feb 15, 2009 6:28 pm
- Contact:
-
DervConvert
- Cetane Booster
- Posts: 28
- Joined: Tue Oct 20, 2009 5:38 am
- Location: South Coast, UK
Re: VE injection BOSCH.
Hello Hagar, how is your "drove" (collective noun for rabbits) and what is your highest MPG score to date? I am a big fan of your work, I find it fascinating.hagar wrote:DervConvert : about the BOSCH VE pumps , you are off to a good start. Keep going.
To take apart ordinary tools will do it NO need to grind any sockets etc. . I have done many. I shall try to get the "Worm" to send you a copy of the BOSCH manual I am sending to him.
One WARNING , take your time , haste makes waste. EH ? and Andrew is a good helpmate..
hagar.
PS : I use Paraffin Wax to hold some springs and shims in place when assembling. (ParoWax) it works like an exstra couple of hands.
Although I must admit my motive is for best power, that's not to say I am not happy to work towards better economy at a later time. I've successfully run my previous diesel on SVO which made for cheaper running until the food shops decided to profiteer from the increased sales (as news got out) by increasing the price tag to that of diesel! I have also been reading/learning about other additives I can/should use (though I'm unsure how different our fuel is to that when these pumps were designed). I've contacted Shell and Esso to try and locate the Aeroshell oils and Parowax - it's a rare product in the UK I believe. Food shop assistants often think I'm asking for beauty products.
The only tool I probably don't have is the one for the three-sided governor lever securing bolts though I feel confident I can find a safe and reliable method to undo and refit them or maybe even replace them with normal head bolts.
I already posess and have read the Bosch "Diesel Management" book "Diesel Distributor Fuel-Injection Pumps VE" (thanks for the offer) several times now and believe I have good understanding of how it all interworks, I just haven't found any in-depth guide to correct disassembly with notes of where to be most careful and why. I have read all 140+ plus posts of your thread. I have also taken your advice to read Andrew's and Mark's posts (though haven't covered them all yet!). I now feel it's close to the time to stop reading and start doing.
I began mixing wax with diesel and observing their melting point and cloud points. Once data is recorded for that mix, I increase the wax ratio and repeat and will continue to do so until I have the perfect consistency for "glueing" the parts together on rebuild.
The reason I got a spare pump is so I can take my time and if I goof up (something I'm a natural at
The bit that concerns me most is removing the distributor head as I've been warned there's danger of snapping the shaft?
From reading Hagar's and other's posts I feel confident I don't need any shop to calibrate my pumps, I just measure the internal pressure, right? Ok, maybe I'll need them to set the delivery valves and injector pressure if I can't get myself a pop tester.girlguidebiscuit wrote:Parts for a rebuild don't seem to be a problem but what is, is getting any tune shop guy willing to run up and calibrate a pump if they havent rebuilt it themselves. There's two in the small city where I live and both told me "your work might bust my expensive tune machine." Comments?
Regards,
M
M
-
Fatmobile
- Global Moderator
- Posts: 7566
- Joined: Wed Oct 30, 2002 10:28 pm
- Location: north central Iowa
There isn't a threat of snapping a shaft.
The main concern when removing the distributor head is everything falling out.
Do it with the drive shaft pointing downward and that won't be a problem.
My first one I opened with it horizontal, everything fell out and this post wasn't invented yet so i had no idea how to put it back together,.. but i really didn't take the first one apart intending to put it back together.
'91 Golf gasser converted to a 12mm pump, M-TDI.
'84 1.6TD Rabbit with a VNT-15 turbo, still setup to run on vegetable oil.
'84 GTI with 1.7TD pistons and intercooled.
2003 TDI wagon
2000 TDI Jetta.
'84 1.6TD Rabbit with a VNT-15 turbo, still setup to run on vegetable oil.
'84 GTI with 1.7TD pistons and intercooled.
2003 TDI wagon
2000 TDI Jetta.
I think you're over-thinking it a bit although everyone has their own process. Once you have pulled a pump or two apart, then you see that they are not really all that complicated. Probably similar in complication to the engine they are bolted to.
Here's a link to a pictorial I put together a pictorial on the LDA assembly.
Installing the distributor head is not difficult. There are two ways that I've seen. One is to "glue" the little springs in with vaseline or wax and to install the head after the control collar lever assembly. The other is to install the head first with the little springs and use a clean appropriately sized putty knife to shoehorn the control collar lever assembly into place. I prefer the second method.
Additional mods to consider if performance is the goal; increasing total advance (by modifying the dynamic piston, cover, cold start lever assembly and pump case), increasing accelerator shaft arm offset, increasing head/plunger diameter, higher lift camplate.
For a non-turbo pump, adjustments other than internal pressure include adjustment of the dynamic piston spring, the governor shaft position (if equipped with load dependent timing), throttle to shaft orientation, max fuel, max rpm, idle. For an aneroid equipped pump there are the additions of spring seat height, rotation of cone, cone rest position. Did I miss any?
If you are interested in performance, you should frequent the GTD forum (www.vwdiesel.net).
-
girlguidebiscuit
- Glow Plug
- Posts: 8
- Joined: Sun Feb 15, 2009 6:28 pm
- Contact:
I think there's a little bit more to it than that, sorry DervConvert. But I'm a beginner here too, and perhaps it's not so hard. However the IP setup/tune section in my Toyota 2C motor service manual (not the rebuild section) is 15 pages long with diagrams and tables! And it seems pretty clear (for the moment) that you have to have the tuneup bench. Diesel fuel guys sleep with their tuneup machines, they love and protect them so much.From reading Hagar's and other's posts I feel confident I don't need any shop to calibrate my pumps, I just measure the internal pressure, right? Ok, maybe I'll need them to set the delivery valves and injector pressure if I can't get myself a pop tester.
I recently DID have to rebuild my IP and although I tried and tried (and tried) there was no way anyone was going to tune the pump after I did the work.
However I did have what I thought was a good used pump, and one guy in Auckland (our biggest city) agreed to run it up and check it out, so I sent both pumps up.
But guess what? He told me the replacement was a dud. I still have no idea if he was telling the truth. But I ended up paying full price for a total rebuild of the original pump, and let me tell you it goes damned good. It had better, it cost me a packet of dough. And I threw the spare pump in for parts, PLUS they kept my spare injectors!
If anyone can point me to a DIY way to calibrate an IP, I would STILL like to learn how.
Paul
-
DervConvert
- Cetane Booster
- Posts: 28
- Joined: Tue Oct 20, 2009 5:38 am
- Location: South Coast, UK
Thank goodness for that! Though I'm aware that as the head is under spring tension, should care be exercised when loosening the four reataining bolts?Fatmobile wrote:There isn't a threat of snapping a shaft.
You might have a point there, I've been aware since childhood that I have to work 10x harder than most people to understand the spoken or written word while it only takes maybe 5x more work to understand through clear diagrams so please forgive me if you find my queries laboured or my wording bordering on non-sensical and alien.libbybapa wrote:I think you're over-thinking it a bit although everyone has their own process.
Excellent! This is what I enjoy reading, thank you for sharing and taking the time post/write these educational posts.libbybapa wrote:Here's a link to a pictorial I put together a pictorial on the LDA assembly.
I'm still sitting at the dismantling stage though I might have to come back to this topic later. But from what you say, I think I'll prefer the second method also. Will have to see nearer the time.libbybapa wrote:Installing the distributor head is not difficult. There are two ways that I've seen.
By reading this alone I realise I've got a lot more learning to do!libbybapa wrote:...increasing total advance...increasing accelerator shaft arm offset, increasing head/plunger diameter, higher lift camplate.
As above although I do understand most of these to a degree.libbybapa wrote:...the governor shaft position (if equipped with load dependent timing), throttle to shaft orientation, max fuel, max rpm, idle. For an aneroid equipped pump there are the additions of spring seat height, rotation of cone, cone rest position. Did I miss any?
And I did, kept me awake until the early hours and I barely touched the surface, so to speak. Thanks Andrew.libbybapa wrote:If you are interested in performance, you should frequent the GTD forum (www.vwdiesel.net)
Regards,
M
M
-
DervConvert
- Cetane Booster
- Posts: 28
- Joined: Tue Oct 20, 2009 5:38 am
- Location: South Coast, UK
Then I misunderstood you, my apologies. I now think you mean calibrating the pump as from new whereas I initially thought you meant from an already calibrated (or at least an acceptably running) pump with all settings pre-marked for re-alignment on rebuild.girlguidebiscuit wrote:I think there's a little bit more to it than that, sorry DervConvert.From reading Hagar's and other's posts I feel confident I don't need any shop to calibrate my pumps, I just measure the internal pressure, right? Ok, maybe I'll need them to set the delivery valves and injector pressure if I can't get myself a pop tester.
As for tuning; Obviously there is a wide array of tweaking options (as Andrew kindly listed above) which I'll be experimenting with but for now, I'm concentrating on strip down and learning from the secrets hidden within
Regards,
M
M
-
doonboggle
- Cetane Booster
- Posts: 67
- Joined: Thu Sep 17, 2009 10:37 pm
- Location: Nevada
Re: VE injector pump assembly pictures.
I've taken the original post (of above) with all the images and cut-n-pasted it into a word document that you can print out. I don't see a way to post it to this forum, so if you want a copy, p/m me using the membership list. I'm also going to try and convert it into a pdf file.vaughanatworld wrote:I was directed to the following URL by a helpful injector pump expert:
viewtopic.php?t=5392&highlight=bosch
to see how the Bosch VE injector pump is assembled via a sequence of color photographs. I looked at the photos a couple of weeks ago but they are no longer available on this site. Might someone have an updated URL?
Thanks
Brian
I've also found another version online without as many pictures. It'll be a link.
Chuck