Page 2 of 6
Posted: Mon Nov 22, 2004 9:09 am
by steve
I use snap ring pliers to adjust the timing belt tension pulley. The ones that are bent 90 degrees near the tip are best so you have room.
Posted: Thu Dec 02, 2004 11:56 am
by Brit101
slowjett posted this at the VWvortex forum DIY Front Bearing Replacement.
DIY Wheel Bearing (front) Take your hub assembly off. Use a torch to heat up the outer of the hub, and a mallet (preferably wooden) to pound out the inner hub and bearing. Once you seperate the pieces, take them into you house. Put the new wheel bearing in the freezer allong with the inner hub. It would be good to have them in over night (or at least 6 hours to be sure they shink enough) or else it may not work well. Then when your ready bake the outer hub in the oven (450-500 deg F should do it) for about 2 hours. Take out the hub and the wheel bearing and use your wooden mallet (you may not even need it) to help slide the bearing into the outer hub. Bake in the oven for another 45 mins to an hour, remove it and slide in your inner hub. bake everything together for not really more than an hour. Then your ready to rock.
The reason this works is because when metal is heated it expands, when its cooled it contracts. The tollerances are so fine, the heat and cold will offsett it enough to work.
front wheel bearing
Posted: Fri Dec 03, 2004 12:52 am
by Fatmobile
Hmmm I wonder how the bearing seals like being heated to 450F for 45 minutes.
Posted: Fri Dec 03, 2004 8:39 am
by steve
I don't know about the heating of the seals...
Otherwise it's a great idea but I'd skip the "bake everything together" which was listed as the last step. What purpose does that serve? Just let it all cool down ASAP when you're done.
front wheel bearing
Posted: Fri Dec 03, 2004 7:33 pm
by Fatmobile
I think that was to get it all to expand so the center will go into the bearing.
Re: To test expansion tank caps
Posted: Tue Dec 07, 2004 3:04 am
by v8volvo
jason wrote:I just figured this out tonight.
Take an expansion tank and block off the 5/8 inch port, I used a rubber block off cap. Then connect a pressurised air source with a gauge, I used an old bicycle foot pump with gauge. Put the questionable cap on the expansion tank and pump the assembly up. On my 82 rabbit a good cap releases the pressure at ~20 psi. I had a bad one that took over 30 psi, I stopped because I didn't want to blow up the tank.
Cheers,
Jason
This works brilliantly. I just tested the cap off my Rabbit, and it took more than 25 psi before I could hear hissing. And I wondered why my heater core and water pump gaskets blew...

Keep these coming--what an awesome thread! Hopefully someday I'll contribute something....
Posted: Tue Dec 07, 2004 2:43 pm
by Vancouver Van
don't know if this counts, and I'm not in my normal Vanago chatroom, but saw the thread and must say half the fun of the Westy is making it go without spending money.
When rebuilding my 1.6D, I didn't care to spend hundreds on a molded hose. I think it was $360 or some awful thing - for a set for the engine.
I made a manifold out of copper pipe and fittings, all fit up so it connects with short pieces of very excellent silicone or reinforced hydraulic hose. So far, it works great, and the weak old molded hose travels as a spare.
With the scrap copper, I made a very excellent tool to align the injector pump sprocket....
Posted: Wed Dec 15, 2004 7:13 pm
by srivett
I was just walking past my 1.9TD and decided to measure the notch in the cam shaft...it's 4.4 mm. My door hinge that I found in the back room is sort of a wedge shape when closed and fits in far enough to be useful. All of the other tricks for the 1.6s timing also work on the 1.9D/TD although some have auto belt tensioners and different IP pulleys.
Steve
valve adjusting shim plier mod
Posted: Sun Feb 13, 2005 7:18 pm
by subiemech85
if you have a "standard" valve shim adjussting plier, you can make it "spring loaded" by adding a compression spring
I used a "handi-pack" part # 88015 15/32 x 1-1/8 .047 wire dia
Front Strut tool
Posted: Tue Feb 15, 2005 12:07 am
by benva
Mentioned this in an earlier post, but the front strut needs a special tool to get the nut off of the top. The allen key fits into the top to allow the strut to lock so that you can remove the bolt on the top. The cheapest tool that I know is to get a deep socket (21 mm I think) and just use a grinder on the side walls and take probably about half of it out. You might think that you are make the socket too weak, but it looks just like the VW tool in the end, so if it works, why can't yours. I have done this twice and both times worked like a charm, and a lot cheaper.
Ben
93 AAZ Jetta
91 TD Jetta (Trying to Fix)
home made tools
Posted: Fri May 13, 2005 1:33 pm
by Fatmobile
Here are some of my home made tools.
The rear seal tool that gets the seal lip over the crank edge.
Remember to cut off the top lip and smooth the edge.
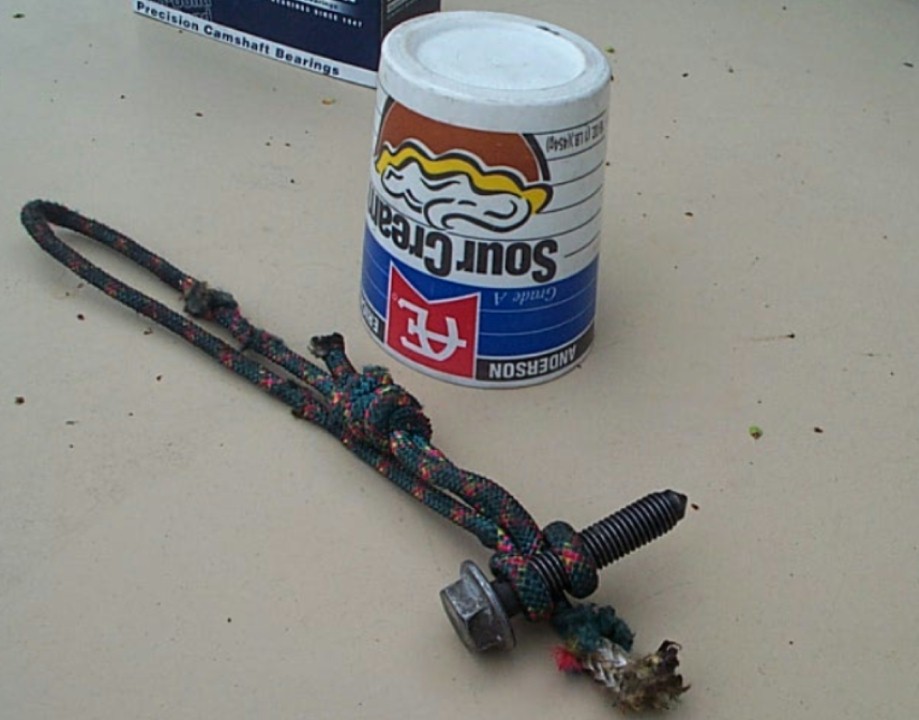
Along with the flywheel holder that gets bolted to the block using a trany mount hole and a rope stuck the the flywheel gears.
Put the bolt in the trany mount hole and twist the kevlar climbing cord before sticking it to whatever you don't want to turn as you tighten or loosen bolts. That's about a 10" loop.
My glow plug ammeter.

Thats an old glow plug wire that normally goes from the fuse to the glow plugs. I don't have a picture yet but I followed hagar's advice and just put clips/clamps on the ends,... one end clamps to the battery the other end clamps to the glow plug,... ammeter in the middle. This way I don't have to bolt it into the glow plug system to test glowplugs.
My vacuum pump and booster tester:

My I-shaft bearing driver:

Someone told me the hex tool needed to remove the plastic trany timing plug is the same size as an injector...

They were right.
Here's a couple more tools in action:
The bushing in the A1 alternators can make it tough to slide the alternator back on so I press it back a ways, using a bolt nut and washer to press it back into the socket.

...and this is what I use to pull stuborn injection pump sprockets:

Re: home made tools
Posted: Fri May 13, 2005 2:14 pm
by Guest
Fatmobile wrote:Here are some of my home made tools.
<snip>
My pressure plate/ flywheel holder:

Put the bolt in the trany mount hole and twist the kevlar climbing cord before sticking it to whatever you don't want to turn as you tighten or loosen bolts.
Not bad. For that, I use a 14mm (or 16mm) combination wrench. Put the bolt through the box end of the wrench and thread it into the block. Rotate the open end around to catch a flywheel bolt screwed into one of the holes on the pressure plate. It avoids having another "special tool" to keep track of.
Sizes
Posted: Fri May 13, 2005 4:27 pm
by toomanycars
Please give me diameters, lengths....This is a great idea!
These sizes!
Posted: Fri May 13, 2005 4:30 pm
by toomanycars
ad wrote:I bought an adapter to use a dial indicator for setting injection pump timing, only to find that the threaded rod that was included was the wrong diameter, and also the threaded end did not fit my dial indicator.
My solution was to use a brass rod, a roll pin, and a short machine screw of the proper thread. All available from the local hardware store, costing about $1.
Just press the roll pin onto the brass rod, cut the head off the screw, and press the screw into the other end of the roll pin. Use pliers to hold. Press the cut end of the screw into the roll pin so the clean threads are exposed.
If anyone else has a similiar problem, this is a quick and cheap solution.
http://www.geocities.com/adi_orio/Timing.html
Sorry, Guys..I was referring to the dial gauge adapter.
Posted: Fri May 13, 2005 4:38 pm
by srivett
The adapter shown isn't the one Jack sells just in case you are curious. I think the thread on Jacks adapter is 3 mm x 1.0 but I'll have to check for sure. I bought a different guage locally and it fit perfectly...I had hopes of finding a metric one so I didn't get Jack's guage with the adapter. Metric display gauges are TOUGH to find.

Steve


